My Home Espresso Set-Up

Recently I began writing a post about the merits of weighing espresso dose and yield, and then realised I haven’t really ever outlined just what my espresso brewing equipment consists of. I’ll warn you now this most certainly is not a post about fancy high-end equipment, however what I do have does a pretty good job at producing tasty espresso.

img_6598_edit

Of course you can spend as much as you like on this type of stuff, however I’m also a firm believer in maximising the potential of what you have, regardless of your particular level of investment. Further, I believe some great results can be achieved from what is available in the home appliance segment of the market.

So, as a preface to some more posts I am thinking of writing down the line (most of which admittedly exist only in my mind at the current time), what follows is the machinery and other bits and pieces I use to produce stunning, high quality espresso at home. Haha! If I knew what I was doing with this blogging game, that’s a better post title right there.

Before we move onto what is sitting on my kitchen bench, I think it is worth pointing out that while I may have high praise for the machine I use, your mileage may vary of course, and remember my perspective comes from a firmly narrow field of usage. I mean after all, you buy a machine and if it works well, you use it — for many years. I’ve really had no reason to look around or try others out.

In saying that, there are machines and home enthusiasts who can no doubt churn out better results, however I’m pretty happy with what ultimately ends up in my cup.

Let’s get underway then.

Machinery

Espresso Machine – Sunbeam Cafe Series EM7000

As I mentioned in the opening, with the exception of my filter grinder (more on this below), my equipment remains firmly in the realm of what I’d describe as consumer-level home appliances.

img_6563_edit

The espresso machine is a Sunbeam Cafe Series EM7000. This particular one was bought from our local Harvey Norman after seeing an advertised price posted on OzBargain of $399.00. As you can see from the link in the section heading above, the model’s RRP is $849.00, and is routinely listed between around $699.00 and $899.00 in stores (for example at the time of writing, The Good Guys also have an online listing of $679.00).

We purchased the EM7000 fairly hastily, not wanting to miss such a good price, despite being a little wary of the reason for such a large reduction. The decision was made a little easier by the fact we had been using the previous model (EM6910) for about 4 years, and prior to that, the original EM6900 for nearly 7 years (after winning it through a magazine subscription competition). We at least had a certain expectation of reliability and performance through experience.

Although my intention here is not a full product review, suffice to say, in the two and a half years we’ve had the current model, with care and regular cleaning, it performs just about perfectly. Reviews online are mostly positive, and generally when there are issues, they centre around the performance and/or reliability of the steam wand and knob. Admittedly, in recent months I’ve had the steam control knob off and readjusted things slightly, however beyond that I’ve not had any concerns whatsoever. Beyond replacing the O-ring in the group head, that is also about my limit as far as taking things apart and tweaking them.

Why this particular model? As I mentioned, most likely familiarity in the first instance, after owning the two previous models, and the expectation of a few issues being ironed out now that a third generation had been released.

I should mention at this point that from a use perspective, the machine produces two espresso shots, with two (because one is low-fat, and one is not) associated milk steamings each weekday morning, three of each on weekends with an additional two or three more occasionally when visitors call in over the weekend. So although not high volume by any stretch, the machine does see use pretty much 365 days a year.

Other key features include a twin-thermoblock, allowing texturing of milk and extraction of espresso at the same time; relatively rapid heating when switched on; programmable water/steam temperatures and pre-infusion modes; and cleaning cycles for both back-flushing and descaling. A separate hot water arm though not essential, is certainly nice to have, and I do use it to pre-heat the cups.

An aside on the PID controlled twin thermoblock. I’m sure there are purists who prefer a twin boiler to a thermoblock set up, however at the price point we are talking about, the temperature stability is great, and having one thermoblock for espresso and one for steam is a godsend. Although it is of course not essential to simultaneously heat/texture milk and extract the espresso, not having to wait for the machine to alter its temperature before doing so has been a must-have feature for me since that initial EM6900. I don’t think it is something I could now be without.

img_6606The 15 bar pump for producing espresso performs exceptionally well, with a pre-infusion mode to improve evenness of the extraction. Of course every few years the seal needs replacing around the group head, however I have never had any issues with the pump itself.

All in all I’m pretty content with the quality of output from the current machine, and I reiterate here my belief in maximising the little things to create better quality espresso, rather than necessarily spending thousands on a home machine. That being said, like anyone I do dream, and budget permitting I would of course do both — in a heartbeat. Honestly though, my main point is that a machine like this one or others in this category do a great job if you apply a little effort towards the details.

My main gripes? Not many really. The design of the drip tray seems a little short in relation to the group head above it, and sees water splash out onto the bench top when flushing the group head, though flushing into a cup avoids this fairly easily. There is a slight delay in the steam pump shutting off when the switch is closed, however this is easily accounted for after your first couple of uses. I don’t tend to use the milk temperature or espresso pressure gauges in day-to-day use, preferring to use other methods for assessing this information.

img_3752The steam function for heating/texturing milk may be a little slow compared with some other machines (I’m not 100% sure it is), taking on average around 50 seconds for milk to come to temperature for a single beverage, and about half that again for two drinks. Again, in a home setting I believe this is more than acceptable, and I’ve no real complaints about that.

All in all, I’ve been very happy with the Sunbeam line of Cafe Series espresso machines for well over a decade now, and my current model certainly does not disappoint. This is a machine made with commercial touches (Twin thermoblock, brass 58mm group head, sloping portafilter handle etc) rather than commercial components per se (no E61 group head, twin boiler or pressure profiling), however this is what makes it such value for money in this segment of the market.

It’s a great machine I enjoy using each and every day.

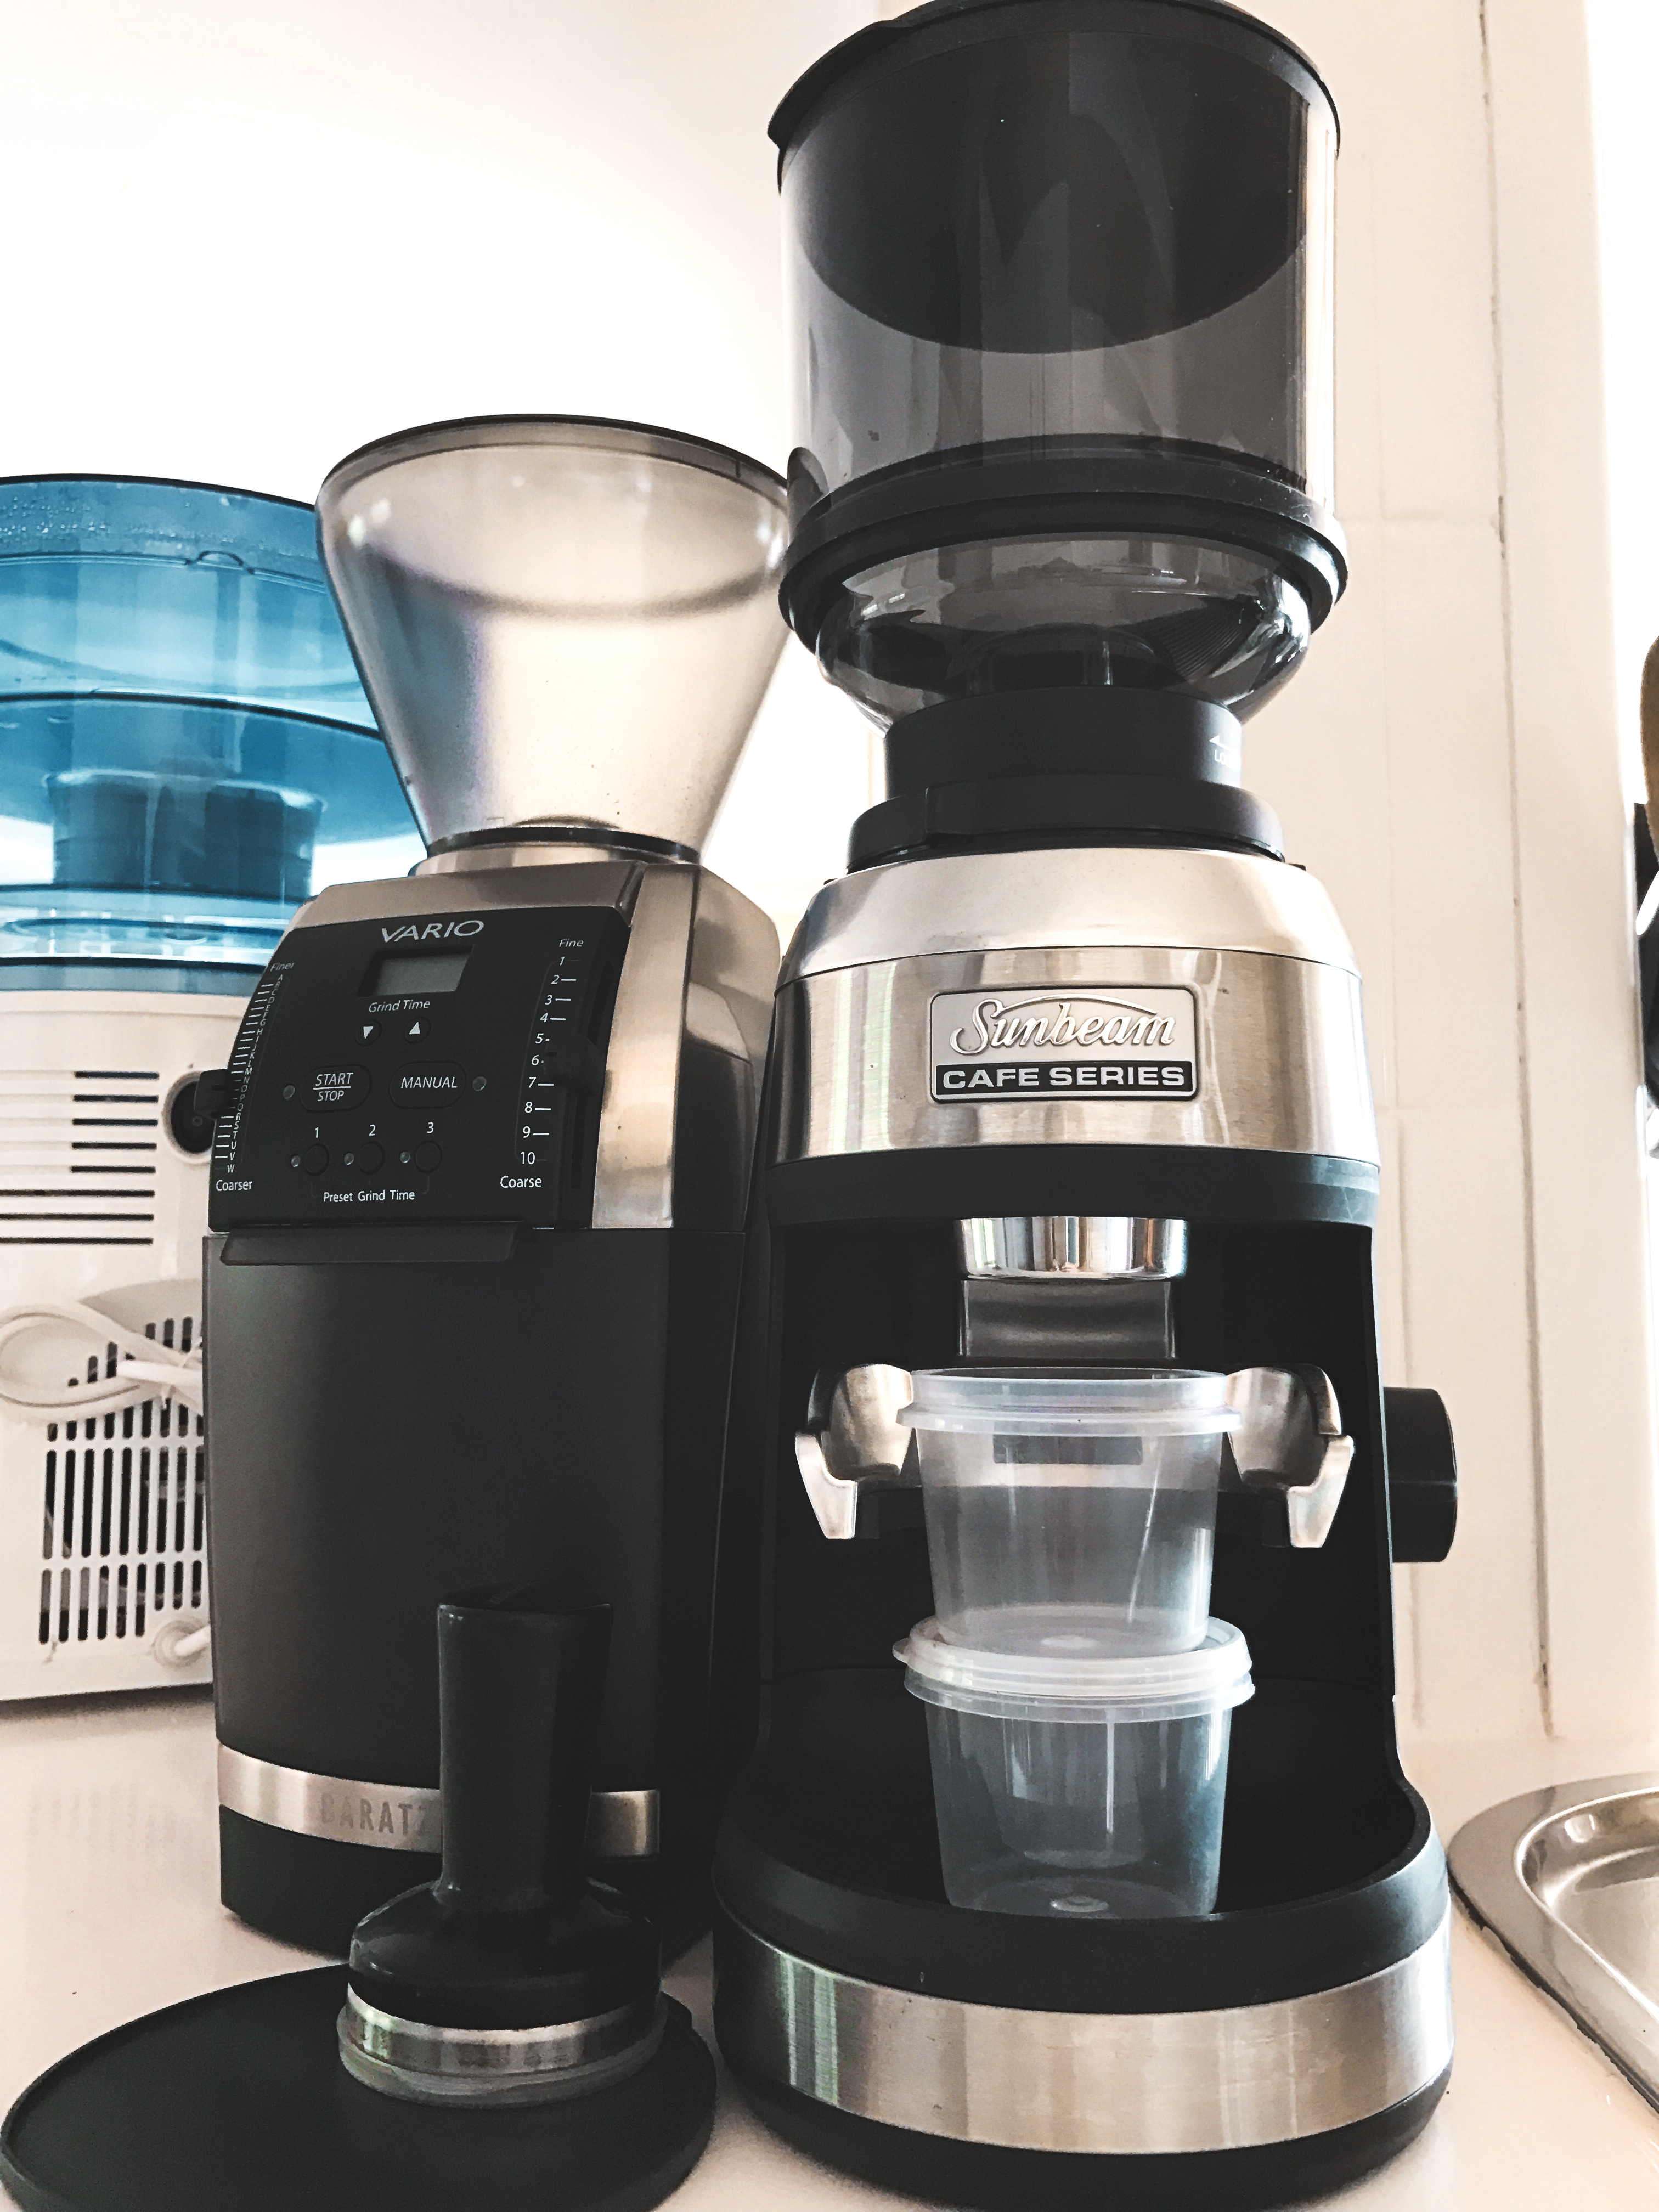
Grinder – Sunbeam Cafe Series EM0700

As you can probably tell from the above, I’m pretty happy with the espresso machine currently sitting on my kitchen bench, and have no real plans to look around for another. Not so the Sunbeam EM0700 grinder designed and marketed as the partner to the machine I’ve discussed above. I would say it does an admirable job, and a replacement will probably come for reasons other than dissatisfaction entirely.

img_6569_edit

Along similar lines to the espresso machines I’ve owned, this is the third in a line of Sunbeam grinders, which have served me well over the years also. The purchase of the current model was made in mid 2014 after an ill-fated, short stint with a Breville Smart Grinder, with which I was unable to adjust the grind fine enough for espresso. I believe the Smart Grinder Pro is the one you want (should Breville be your choice), however at the time I had picked up the particular Breville model at a very discounted sale price.

In any event, it was back to what had been the faithful tried and true Sunbeams again. I say what had been tried and true simply because the EM0700 was a major redesign on its predecessors and I wasn’t entirely sure how the new model stacked up. On the whole I needn’t have worried, as it is more than adequate in coping with the required grind size (read “fineness”) of standard single floor filter baskets along with the aftermarket VST basket I know use.

img_6572The grinder itself contains conical stainless steel burrs, has 30 steps of adjustment (more on this below), 450g bean hopper capacity, and the ability to grind directly into the group handle, with a built-in switch in the portafilter cradle to do so. It is belt driven in an attempt to reduce vibration and noise apparently, however what can I say — a coffee grinder is a coffee grinder — they are noisy beasts.

The main issues I’ve had over the past couple of years relate more to grind retention (grinds left in the chute or adjacent to the burrs), cleaning, and a little inconsistency at times. Add to that the grinds clumping a little has me thinking that if the EM0700 were to give up the ghost tomorrow, I’d probably be looking at an upgrade purchase rather than a direct replacement.

On a side note, in the images I’ve included in this post you’ll notice another grinder — the Baratza Vario, worth far more than the Sunbeam, and a much higher quality grinder in its own right. Why then would I be using the Sunbeam in preference? Simply the fact that every day I grind for espresso as I’ve mentioned above, and also for either AeroPress or my V60 drip filter. I’ve always been apprehensive about constantly adjusting back and forth between coarse and fine settings, preferring to keep one grinder for filter and another for espresso.

Firstly, a rather privileged situation I know, and my intention is to care for the grinders a little more in doing so. Whether this really makes any difference or not I’m not entirely sure, however that is how I roll, and on that basis I will continue. By the way, the Vario was an Instagram competition win through the good folk at Espresso Parts – yes I’ve been very competition-lucky in my coffee journey over the years.

So, the positives I’ve found with the Sunbeam – firstly the price. With RRP at AU$299.00, the grinder can often be found at various sales for around $50.00 less. Next, adjustment. The grinder comes with a stepped, 30 increment adjustment collar, which more importantly can be recalibrated at either end to go a little further than the standard 0 or 30.

Depending upon how you may use it, this ability could be a deal breaker. For my espresso grinders, I need to be able to achieve a fine enough grind to ensure my espresso machine is usable. That is, allows me enough flexibility to control the flow at a given dose. When using the standard single floor filter baskets which come with the EM7000 Espresso Machine, or VST baskets, the grind essentially needs to be similar to what you will find in a commercial setting. This is a lot finer than lower end machines which utilise dual floor baskets to accommodate the pre-ground supermarket coffee sold in vacuum sealed bricks.

I’ve recalibrated the grinder finer than the zero setting to the tune of 5-7 additional steps, which is a little over done, however I still like to be able to drop down a couple of steps if I need to, without hitting the zero marker. The user manual will advise if you recalibrate too finely, it will result in “a metallic grinding noise” as the burrs collide. We don’t want that of course, so if you head down this path, go in small increments. Once done, I was (and still am) more than happy with the level of control I have with the flow of espresso, using minor grind adjustments on a day-to-day basis (between settings 3 and 7 approximately).

I tend to think the EM0700 is better as an espresso grinder (once calibrated), as the particle distribution seems a little spread when grinding more coarsely for filter brewing. That is of course simply my opinion based on very unscientific tests (read a little haphazard use of a sieve to check a few times how consistent the particle size was).

img_1346Those few negatives I’ve mentioned above in relation to grind retention and cleaning aren’t massive, however to elaborate a little. For cleaning, the adjustment collar removes and takes with it the outer burr — handy for getting a vacuum hose around the top and sucking out retained grounds. Firstly, removing the adjustment collar is not an easy task, and takes a significant amount of force to rotate it to the unlocked position, and a little less to remove it off the top (I use the handle of a wooden spoon to push on the lug and rotate it, and the flat end of a wooden kitchen spachelor to lift it off).

Once it is finally off, only then will you see how much retention actually occurs in and around the burrs — and it is significant. I do understand this occurs in many grinders, however takes a little dislodging it the dogleg into the chute. Of course the grinder still functions quite well, however this is not an ideal situation, and I suspect is a major contributor to the clumping together of grinds as they pass through the chute.

In summary, the EM0700 grinder from Sunbeam will serve you well, with regular cleaning and perhaps a little calibration adjustment. I don’t grind directly into the portafilter for reasons related to my own dose-weighing workflow, which is a story for another day. For the price, I’d say the output is of a good quality.

Ultimately though, if I had to choose between replacing the espresso machine or the grinder, it is the grinder which would be shown the door.

Other bits and pieces

What else do I use besides the machine and grinder? A set of Hario scales to weigh my dry coffee dose which goes in the portafilter, and the resulting beverage weight or yield produced in the cup. I’m certainly not going to recommend everyone start weighing their espressos, however it is surprisingly quick and simple to do with the right set of scales, and provides a great deal of feedback if you are looking to become more consistent with espresso brewing.

I use the standard Sunbeam supplied tamper, however one day will up the ante on this a little as well. Does it work as expected? Of course. Another point of note is the commercially sized 58mm portafilter of the Sunbeam EM7000 machine, which accommodates commercial tampers and filter baskets. A handy thing to remember when comparing machines if you are considering some aftermarket accessories or tweaks down the track.

img_6596In addition (which relates to my weighing workflow), I grind into a decor small plastic container, which is easy enough to tare on the scales, and then transfer the grind into the portafilter, as the circumference of the container opening is a precise match for the inside of the 58mm filter basket. So, placing an upturned portafilter on the container, flipping the whole lot over and shaking a little provides a mess free transfer, unclumping of grinds, and decent initial distribution in the filter basket all in the same motion. I’ll go into a little more detail in a future post, however to explain the presence of those little plastic containers, there you have it.

As I’ve mentioned, I a VST filter basket, which is the 18g size. After trying a 20g basket, found that I am best dosing 20 – 20.8g (brew ratio approximately 1:1.8-2.0)in the 18g size. There are significant differences when using a VST basket compared with the standard Sunbeam one, and I’ve found the combination of grind, dose and flow achieved with this combination seems to better suit overdosing the 18g basket a little. Perhaps I am wrong on this, however the results seem pretty good to me.

Finally, I dry wipe the basket with a paper towel, tamp on an old rubber mat from the base of a previous (Sunbeam) grinder, and away we go. Once done, the used grinds are then disposed of in a Sunbeam knock box which sits in a corner on the kitchen bench.

To Finish

Boy, this has been a little long-winded compared with what I had in mind at the beginning, and when that happens I’ve probably made things more confusing, rather than simply providing better detail.

Frighteningly, there are a few points I’ve deleted and some I’ve left out, which I think will be best served in future posts I’ll hopefully get around to writing.

img_6561

I think the best way to sum my feelings on the current set up is to report that this morning I got up, fired up the machine (which is ready in about a minute), made my wife a 6oz decaf flat white, and myself an espresso and 4.5oz flat white (21.6g dose; 44g beverage weight), and was more than happy I had the equipment to produce exactly what I wanted.

Further, I would be happy using everything I currently have for a number of years yet, and I think that speaks volumes for both the espresso machine and (mostly) the grinder.

Cheers. Like another?

What’s Brewing: Burundi Musumba Natural – Monastery Coffee, Adelaide

img_6464Almost all of the coffees I write about here on the blog are those I have purchased as green stock and roasted myself. This has been an intentional approach as the aim of my coffee writing here was never to be a café or coffee review site as such.

So what exactly, is the aim? As I’ve mentioned in the past, it is to share my enthusiasm for learning more about this humble brew which brings so many of us together across the globe. Part of this has always included looking into the growing regions and farms where these coffees are produced (assuming such information is available), and the Musumba Hill co-operative in the African nation of Burundi is what I’d like to explore a little further today.

I picked up a bag of the Burundi Musumba from Strauss in Brisbane’s CBD when the coffee was featured as part of a regular rotation of guest roasters.

The Country

Burundi is a small country in east Africa, covering almost 28,000 square kilometres, has a population of 10.4 million people, and is served by the capital Bujumbura. It shares borders with the Democratic Republic of the Congo, Rwanda and Tanzania (the latter two are of course being well-regarded coffee producing countries in their own right).

The Burundi country profile on the BBC News site reports:

Burundi, one of the world’s poorest nations, is struggling to emerge from a 12 year, ethnic based civil war…

The ethnic violence sparked off in 1994 made Burundi the scene of one of Africa’s most intractable conflicts

From the Central Intelligence Agency World Factbook:

Burundi is a landlocked, resource-poor country with an underdeveloped manufacturing sector. Agriculture accounts for over 40% of GDP and employs more than 90% of the population. Burundi’s primary exports are coffee and tea, which account for 90% of foreign exchange earnings

The Facebook goes on to say Burundi’s GDP in 2015 was an estimated $7.711 billion, placing it at number 164 compared with the rest of the world’s countries. Further political unrest in 2015 resulted in disruptions to the flow of agricultural goods due to blocked transportation routes. It is hoped funding assistance from the World Bank will help restore this infrastructure and again lower transport costs.

The median age of Burundi’s inhabitants is 17 years, and life expectancy at birth is 60.09 years, placing it at a lowly 197 compared with other countries throughout the world. In reporting on population estimates, the Factbook also has a side note which sadly, is not uncommon for many African countries:

…estimates for this country explicitly take into account the effects of excess mortality due to AIDS; this can result in lower life expectancy, higher infant mortality, higher death rates, lower population growth rates, and changes in the distribution of population by age and sex than would otherwise be expected

The sites I have quoted above contain significantly more information than I have pulled out and presented here, and a Google search will provide an ongoing timeline of unrest and turmoil, with a report in The Guardian just a few days ago outlining a UN report alleging human rights violations and high risk of a “spiral of mass violence” in the country. The government has since denied the allegations.

An optimistic, yet cautious James Hoffmann writing about Burundi in The World Atlas of Coffee (2014):

With 650,000 families dependent on the crop, movements towards higher prices through improvement of quality can only be a good thing. However, the constant fear of political instability returning looms large

IMG_4001

A favourite image of mine from The World Atlas of Coffee

Of course my intention is not to simply paint a negative picture of Burundi, however I do wish to point out the significant challenges faced by its coffee producers, and am thoroughly amazed anything is produced at all, let alone processed, shipped, and resulting in the quality of cup I can enjoy sitting here in my lounge room.

The disconnect between where this coffee originates, and where it is now being brewed and consumed is stark, a fact which also makes the Long Miles Coffee Project so remarkable.

The Long Miles Coffee Project

2016-09-25-burundi_post_lmcp_logoI have now been sitting in front of a blinking cursor for quite a few minutes in an attempt to put some words around the story that is Long Miles, however this is probably best done by the Carlson family’s Long Miles Coffee Project website:

We are a small American family living in Burundi, which is smack dab in the heart of east Africa. We are passionate about producing amazing coffee and caring for the well-being of the coffee farmers who grow it. We weren’t always coffee producers. First, we were a family with a dream.

Part of that dream? Working with Burundi’s farmers and growers to facilitate direct working arrangements with the world’s coffee roasters. Another part? Building a washing station to enable better quality control and price guarantees for local farmers.

I highly recommend perusing the posts on the site’s blog, where you’ll find writing such as that of June 9, 2015, about the family’s need to exit the troubled nation:

I had heard heavy gunfire all morning but after weeks of violent protests, that was nothing new. We had been sending them off to school with the sound of tear gas bombs as their soundtrack. This day was somehow different; suddenly I felt my gut turn and I just knew — the time to get to school was NOW

Only to return in April of this year in time for the next harvest:

There just has to be hope, and it’s there for the choosing. So, on the back of one of Burundi’s darkest days, we began packing. I don’t call this choice bravery or stupidity (it’s been called both) – I just call it ours. Our choice to be home. Our choice to sink our roots into the soil of Burundi, come what may

Other inspirational, humbling, and even amusing stories on the blog from some of the coffee farmers themselves show just what a difference one family has made to the lives of many.

There are a couple of thoughts which repeatedly come to mind as I sit here and write about this fine coffee from Burundi, the country itself, and the Long Miles Coffee Project.

In the first instance, many of us have enthusiasm and passion. Fewer have a call to action, and fewer still, uproot their families and plant them in one of the poorest, most politically unstable countries on the planet. The result? Touching the lives of those less fortunate in a way that will go a long way to securing (as much as it can) the future generations of Burundi coffee farmers and their families.

It is a story worth telling.

Speaking of which, you could say there may at times be a sense of “story fatigue” in specialty coffee. Of course every coffee has its own origin story — equally as valid and important as the one I am passing on to you here. Reading a little further on the plight of farmers in Burundi however, reinforces that these are not only stories on the back of a coffee bag. These are real people, often struggling to survive each and every day, in conditions we in our comfortable lives will never experience.

Again, I urge you to visit the Long Miles Coffee Project website to see more examples of this great work for yourself — some of which has resulted in this fine coffee from the Musumba Hill co-operative finding its way to, and being roasted at, Monastery Coffee in Adelaide, Australia.

The Coffee

Information courtesy Monastery Coffee

  • Burundi Musumba Natural
  • Roaster: Monastery Coffee, Adelaide, Australia
  • Washing Station: Bukeye
  • Organisation: Long Miles Coffee Project
  • Region: Kayanza
  • Country: Burundi
  • Processing: Natural
  • Elevation: 1,800 m
  • Varietals: Heirloom Bourbon
  • Tasting notes: Strawberry, Chocolate, Spices

This lot received a lot of attention – a dedicated team of 4 women stir and monitor the coffee cherries throughout the day on raised ‘drying beds’ to maintain even drying of the coffee,

At the time of writing, the coffee is available directly from Monastery (AU$18.00; 250 g); free shipping within Australia.

The Brew

Being a filter roast, the majority of my consumption has been through a V60 drip filter, and to a lesser extent an AeroPress. If I had to choose, the V60 makes a cleaner, more nuanced cup —as you’d expect.

In terms of flavour, it is after all, an African Naturally processed coffee, and with that you will find the requisite fruit bomb in the cup. Think strawberry, yes, however as the brew cools a little, things begin to open up even more. The mouthfeel becomes a little creamier, and as the acidity rises, those strawberry flavours really concentrate, moving through strawberries and cream, to almost a red cordial of sorts.

A description such as the one above may sound like an overpowering trip down the “red” spectrum of flavours however that is not the case at all, simply descriptors which came to mind as I worked my way through the brew one afternoon. If we were sticking with the coffee favour wheel, then strawberry in abundance is definitely where I’d pin it. The acidity is spot on, it has medium body and a lingering finish, being a joy to sip and saviour.

As espresso — yes, I run all of my filter roasts through a longer shot out of curiosity, and here those strawberry flavours dominate again, with a hint of chocolate. As a milk drink it stands up pretty well, however the acidity is a shade high as an espresso — though of course is again not surprising in a filter roast.

The Finish

2016-09-25-burundi_post_flowerI do realise this post has run a little long compared with the usual What’s Brewing format, however as I’ve mentioned above, there are stories worth telling.

This coffee from the Musumba Hill co-operative itself? Well, it’s a beauty, and is an example of adversity resulting in greatness. I’d highly recommend picking some up if you get the chance.

For me, this post has been part coffee exploration and part geopolitical discovery, combined with a healthy reminder about where these coffees actually come from and the lives of those who produce them. If this post does nothing else, at least click-through to the Long Miles Coffee Project site, and browse the faces and words of those dedicated coffee farmers.

When you next sip your favourite brew — remember them.

What’s Brewing: Colombia San Marcos

I’ve been roasting and sampling quite a few coffees of late — certainly too many to write about all of them. There are however probably a couple worth mentioning — one of which is this beauty produced by a group of small farm-holders under the San Marcos name in the Huila region of Colombia.

The Region

Wikipedia tells us:

Huila (Spanish pronunciation: ˈwila) is one of the departments of Colombia, and is located in the southwest of the country, with Neiva its capital. Colombia’s second highest peak, the Nevado del Huila volcano, is located in the Huila department. The Magdalena River is Colombia’s largest river, and rises in the Huila department, with the river valley containing some of Huila’s most important towns.

Of course much of the country has a strong heritage with its coffee growing regions, and nearby department Quindío houses the National Coffee Park.

Again from Wikipedia:

The National Coffee Park (Parque Nacional del Café) is a theme park located in the department of Quindío, Colombia, 4 km south-west of the town of Montenegro and 11 km west of the departmental capital city Armenia. The park can be reached from a cable car, offers attractions orchid animatronics colorful, global coffee garden, a roller coaster, food stalls based on coffee, Colombian folk architecture, and other attractions.

1024px-Colombian_National_Coffee_Park_195

The Colombian National Coffee Park – Image courtesy Uria Ashkenazy

The Coffee

All information in this section courtesy Ministry Grounds Coffee:

  • Coffee: Colombia San Marcos
  • Region: Huila
  • City: San Marcos, Timaná
  • Variety: Caturra (70%), Colombia
  • Altitude: 1,500 – 2,000 metres above sea level
  • Processing: Fully washed and dried on raised beds
  • Owner: 30 small holder farms
  • Tasting notes: Balanced and clean, with bright orange acidity, intense sugarcane sweetness, and notes of milk chocolate, caramel, honey and marzipan and lingering sweet finish.

The 30 small-holder farms under the San Marcos name, farm in the town of Timaná — located in the south of Huila, 180 km from the state’s capital Neiva, a prime location for growing high quality Colombian coffee.

The San Marcos small-holders are members of the Association of Agricultural Producers of Timaná (Asprotimaná), who have helped this group find access to specialty markets for their exceptional coffee. Created by a small group of coffee growers in 2002 as a way to increase their bargaining power and achieve a better price for their coffee, currently the association has around 150 coffee producing members, who produce on average a total of 10,000 bags of green coffee annually.

The Brew

I often order in South American coffees with the expectation of fairly bold, full-bodied results in the brew. This offering from San Marcos in many ways achieved that, yet with exceptional balance and subtlety as well.

Brewed in a V60 drip filter, the end result was an exceptionally creamy, medium bodied drink, with a smooth, lingering finish. The overall flavour profile I’d describe as choc-orange, however there were definitely notes of blackberry, honey and toffee in there as well.

Whilst not as clean when brewed with the AeroPress, it was very well-balanced in the cup, displaying perhaps a little more of that toffee sweetness. It was enjoyed equally as well by my buds in our little office coffee collective as a start of the day pick me up.

When brewed as Espresso, again, the combination of orange acidity, sweet toffee, and chocolate, made for a choc-orange bomb in a cup. A real winner on all counts. When combined with milk in a cappuccino or flat white, although a little more subtle, the sweetness of the milk and those choc-orange flavours presented a Jaffa milkshake of sorts.

The Finish

This offering from the small-holders of San Marcos is well worth trying, whether you’re a filter or espresso type, and will serve you equally well through either method. If – like me — you are both, then there is a treat in store with this superb Colombian.

It looks as though there is still some available on the Ministry Grounds website (links above), and it would be advisable to get on over and order some, otherwise I might just snap up the rest.


The Bean Brewding Self-guided CBD Coffee Tour

2016-06-04 coffee_tour_frontSpecialty coffee has certainly enjoyed a rise in Brisbane over the past three or four years. Although a number of cafés and/or roasters have emerged in suburban areas, for workers in and around the CBD there has never been a better time to sample some of Brisbane’s finest coffee.

If you are inclined to agree, though are perhaps wondering where to start or visit next, Glenn and George at Bean Brewding have things well and truly covered. The team behind Brisbane’s first and only coffee tours (running since 2012) have devised a handy Self-guided CBD Coffee Tour, mapping your path to some of the better coffee stops across the city of Brisbane.

You can find out more about regular coffee tours of various regions in and around Brisbane, as well as other one-off events on the Bean Brewding Coffee Tour Page, and having attended several, I can highly recommend them.

The tour is a stroke of genius, and reminiscent of the “disloyalty” card which sprang up in London (or so I believe) a few years ago. Regardless of the name, the idea is to guide the budding sipper to establishments where great coffee is served, however might be outside the usual well-travelled radius from your office. Of course I should also acknowledge working in the Brisbane CBD is not a pre-requisite to enjoying the great coffee it has to offer either.

2016-06-04 coffee_tour_list

Listing eight cafés from Margaret St all the way across to Roma St and many in between, the tour operates in a similar way to the well-known loyalty card concept — in which your final stop (in this case the eighth coffee) is free. I’d argue however, the benefits of embarking on this journey far outweigh simply saving a few dollars.

In one sense, yes, it is a geographical journey around Brisbane’s CBD – however it is also a journey through different styles of coffee, roasters, brew methods, and cafe environments. It’s a way to experience something different, yet of a quality endorsed by some of Brisbane’s most experienced coffee drinkers. It’s choosing to step off that well-worn path from the office to your “local” and back.

For me, it is also the unexplored adventure of visiting somewhere a little different, in perhaps an unfamiliar environment — and revelling in the experience for a short while before that inevitable return to those elevator doors back at the office. If you think that’s overstating things a little, perhaps you don’t see your coffee and lunch breaks the same way I do. Fair enough — though either way, I believe you’ll enjoy this tour.

As they say, every journey begins with a single stamp (or something like that anyway), and I’m away. Of course as you can see, the one I have collected so far is at the end of that well-worn path I’ve referred to above, however I’ll get there. You see for me personally, my cafe life is a hopeless combination of familiarity and loyalty (the merits of which I am happy to vigorously defend), so I plan on using this card to do exactly what I’ve suggested above — sample the delights this city has to offer, and with the weather that little bit cooler, there has never been a better time to charge around the city.

So, whether you plan on working from top to bottom, or perhaps random number generating your way around — pick up a card from any of the participating cafe’s and get started. I’ll see you on the trail, or perhaps at the brew bar, and do check in with the hashtag brisbanecoffeetour — I’m sure the guys would enjoy hearing of your journey. Whichever way you go, might I suggest the idea is probably not to get through the entire list in one day.

Though I’m sure if we start early enough…


Coffee: A Natural Processing Experiment Part 3 – Results and Conclusion

Welcome to the third and final post in a three-part series on a small-scale coffee processing experiment I undertook in my back yard. The first two posts can be found here:

Coffee: A Natural Processing Experiment Part 1- Processing Methods

Coffee: A Natural Processing Experiment Part 2 – Methods and a little madness

A quick recap:

Late last year I picked a small crop from the coffee trees which are thriving at my parents house in northern New South Wales. Having processed a batch of the same coffee using a washed method a couple of years ago, I decided to try my hand at natural methods. The previous two posts and what follows below describe how things went for two separate batches: one “honey” processed, and the other a “natural” processed batch.

Part of the crop

Part of the crop

Results are in

In summary, the natural processed lot dried really well, however as I alluded to in Part Two of this series, the honey processing wasn’t quite as straightforward. I’ve broken things down a little further on each below.

Natural process

The naturals were a breeze to manage, and appeared to move fairly quickly in the early days of drying. It was fairly apparent early on some of the beans most likely commenced the process with less moisture content than others, as the darkening and progression from red to almost black which occurred within the first 7-10 days proceeded at different rates.

Once this first week or so had passed, the entire batch of naturals were mostly a uniform black colour, and the outer skins began to shrink and harden further. Looking back on some of the guidelines from the Part One post in this series — from Sweet Maria’s on climate suitability:

If a farm can dry coffee from ripe cherry to hard, dried pod in 20 days, it is probably well-suited to DP (dry processing) methods.

If I look at the naturals after 20 days, I think they would have been almost ready to go, and probably could have been removed from drying, hulled, and the bean then dried a little further at that point, resulting in a total drying time of around 30 days.

Natural processed batch across four time points.

Four time points: natural processing.

This is exactly what I should have done, however with a lot of my focus on the honey processed batch, it didn’t really occur to me to just pull the naturals from the drying bed and proceed with the next stage of processing. As I write this it sounds ridiculous not to have done this, however also in retrospect, I at least know what the longer end of the drying scale produces, and I’d rather have that knowledge in the bank and work on a shorter time period in future. Have I ever mentioned before I do these things to learn? I think I may have somewhere along the line.

In any event, the naturally processed batch had dried well, and it was onto hulling – or removing the outer skin, pulp and parchment layer. This was a fairly straightforward process, however with anything more than a very small batch becomes very time intensive. Piercing the skin with my finger nail, opening the dried pulp and pulling away all of the layers together left the just the green been, with a little silver skin which often clings, and is blown off during roasting.

Hulled and ready for roasting

Hulled and ready for roasting

In comparison with the washed processing method (of the DIY kind), if we are talking total effort and time, I found the removal of these outer layers all at once to be easier than the separate steps of pulping followed by removal of the dry parchment post-drying.

Honey process

It was with the honey processed batch that things were held up a little. I’ve mentioned in Part Two about the sticky outer coating of mucilage on the beans — and when I say sticky, I mean really, really sticky.

I had assumed after a week or so this would begin to dry out, which did occur as a warm dry day progressed, however as each day drew to a close and the air temperature fell, the stickiness returned. I even tried bringing them inside at night (stopping short of tucking them in after turning down the bed and laying a chocolate on their pillow) for a number of days however this really had no effect.

At the time I simply pushed on, assuming perhaps after a few weeks I’d have a dry batch, however this wasn’t so. Of course my error here was assuming an outer dry layer correlated with drying of the inner bean. I’ve yet to work out an exact relationship between the two, however I’d they are in some way related.

At around day 16 or 17 the first signs of dark spots began to appear on the outer surface of some beans. I proceeded on the basis I would either end up with a batch of beautiful “black honey” processed beans, or a heap of mould. I had my hopes on the former, however fully expected the latter. Remember at this stage things were still quite sticky, so I thought I had a way to go before they might be ready. In reality, it took another 10-12 days before the black spots began to increase. After around 38 days, it had well and truly taken hold of many of the beans.

Four time points: honey processing

Four time points: honey processing

So, by that stage I was indeed left with what appeared to be a pile of mould. The evenness in appearance of a true black honey processing method was replaced by what definitely appeared to be groups of black spores enveloping each bean. It was time to cut my losses and proceed only with the naturally processed batch.

A few lessons

First, I’d pull up stumps earlier on both batches of beans if I’d had my time again. Waiting for the honey processed batch to dry further was probably an exercise in futility. In doing so, I inadvertently left the naturals a good deal longer than planned (at least a coupe of weeks longer).

Also, plan on life getting in the way a little. By the time I had really decided the drying time was probably done, it was another week to remove the hulls from the naturals, and a further two until roasting. Not the end of the world, however when most things are limited to weekends, it’s not hard to blow out a scheduled timeline by weeks at a time. That said, I’d rather have that happen than not try this at all.

After all was said and done, I did actually venture back into the shed and remove the parchment layer from a couple of beans in the mouldy honey processed batch. Surprisingly, the bean appearance was reasonably good, however by that time I had already decided to abandon them — probably the wisest choice given the amount of mould on those outer layers.

If you are considering processing your own coffee at home, my advice would be to stick with a fully washed process, or if you are looking to dabble in some dry methods, perhaps go with a straight “natural” process.

Also, having now tried both wet and dry processing methods, I can offer the perspective that in a backyard DIY situation there is a little more work at the “front end” of the washed processing, however after that first week of pulping and washing, there only remains the hulling — or removal of the parchment layer once the beans have dried out.

By comparison, in a natural processed batch, there really is minimal effort required at the front end of the process, and come the time when the dried cherry is pulped and hulled, all layers come away pretty easily, and all you have left is the bean — ready to roast. On balance, looking at the total effort involved with each, I’d come down in favour of the natural processing method. Remember, the issues I had with turning the coffee during the drying process were all related to the honey processed batch. The naturals? As simple as running your hand over them or giving the drying frame a bit of a shake.

Concluding the processing

Reading through what I have written above, you may get the impression getting the coffee this far was all a little too hard, and perhaps not worth the time overall.

Nothing could be further from the truth, and I will definitely be processing more coffee naturally in future. Honey processing? Probably not — I’ll leave that to the experts in Costa Rica, and many other countries now processing this way.

For future batches though I’ll probably begin by limiting the drying time to around 20 days or so and see how the roast and taste compares with the current batch of 50 days duration. From there it’s only a matter of altering the time frames for further experimentation. I’m definitely looking forward to pursuing this further in future.

The remainder of this post will focus on the naturally processed batch, given the outcome of the honey processed lot detailed above.

Roasting

Once processing was complete, it was time to turn to roasting. Something which would be a fairly delicate task given the size of the batch remaining.

Remember, I began with 210 grams of coffee cherries in the each group. After the drying, the Natural crop had reduced in weight to 100 grams, and after de-pulping: 46 grams — a fairly small batch to roast. However, roast we must — otherwise everything to this point becomes fairly irrelevant.

A successful roast

A successful roast of the naturally processed batch

The plan was to brew the resulting roast by filter, so a light to medium roast was in order. For those who may be interested, checking back on my roasting notes, the total roast time was 11 minutes, with a development of 19%.

Drinking

Having climbed the mountain, we were now at the summit, and the amount remaining to brew? A healthy 37.5 grams of roasted coffee, which had rested for seven days post roast and was now ready to go. Given I had a few tasters (family members) around the table, we had one shot at it, so with the hope my grind setting and brew recipe were somewhat close to the mark, away we went.

  • Coffee: Nine South Estate 2015 Natural
  • Region: Alstonville1 NSW, Australia
  • Grower: L & J Denison
  • Elevation: 140 m
  • Processing: Sun-dried Natural
  • Crop year: 2015

So how did it taste?

The result: shared with those who produced it

The result: shared with those who produced it

In all honesty, better than I expected. Sure, it wasn’t the pinnacle of fruity naturally processed greatness, however overall I would describe it as very well-balanced, with medium to light body, mild citrus acidity, with the predominant flavours woody spice and a hint of chocolate. Although not overpowering, there certainly some of those earthy flavours which can be apparent in naturally processed coffee, and these were also evident in the dry aroma after grinding.

A very enjoyable brew, for which I admit to being quite thankful for given the process leading up to actually tasting the stuff. My group of tasters around the table? In summary, I’d say there was general acknowledgement the whole process had been a success, given what was now being consumed. Mostly, the “actually that’s not too bad/pretty good” comments you expect when taste testing something you may be a little dubious about initially.

Of course it would have been sensible at this point to have on hand a sample of the same coffee processed by the fully washed method wouldn’t it? It’s probably a little late to think of that when pouring the brew into the cups. Another for the “in retrospect – this is what I will do next time” file.

In conclusion

I began this natural processing experiment in the knowledge at some point in the next few years I will need to be processing the fruit produced on the coffee tree now growing so well in my back yard.

Where it all began

Where it all began

Having previously managed to process a batch using the wet or washed method successfully, I was keen to see how a naturally processed lot turned out in comparison. In summary, I’d say I have a way to go with both methods, with some experimentation still required as to the length of the drying time with my naturals; and more efficient methods associated with the wet processing. Of course the joy in all of this is the amount of taste testing required to assess the results from tweaks in my processes.

After completing my first foray into natural processing, I think I’ll leave the “honey” methods to the experts, having found this more difficult every step of the way, however I certainly plan to be using the power of the local sunshine for some more natural process drying in future.

I hope you’ve enjoyed reading this series of posts, and perhaps learned something from them — I know I certainly have. Signing off with a special message from the honey processed batch: ”thanks for sticking with me”.


  1. The town I grew up in before moving to Brisbane in 1990. ↩︎