
Image Fernando Rebelo via Wikimedia Commons
A fair question, given the content of the previous post. The “roaster” in this case, being a very rudimentary set up, and notwithstanding the basic nature of the components, does a remarkably good job of roasting and has not to this point led me to consider changing, after some 12 months of home roasting.
The images you will see in this post, are from my inaugural home roast in May 2012, and despite some minor changes to heat settings used and the rapid cooling process, is essentially unchanged from this first roast.
The first thing I must point out is this method was closely adapted from one posted on the Coffee Snobs forum as the Coretto Method. Though I am not a registered member of this forum (something I should consider), I highly recommend it as a source of information from which to learn more about the humble bean, and am grateful for the detailed instructions in the post which played a large part in getting me up and running.
Other sources of inspiration along the way came via magazine publications Crema and Beanscene, along with reading various articles and sites on the web. You can never do too much research!
Equipment
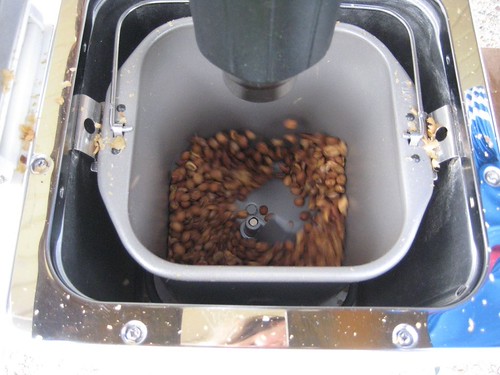
As you can see in the images below, the “roasting drum” is a second-hand Sunbeam Breadmaker picked up at the local “op shop” for $30.00. The original purchase was made with the assumption that if things didn’t work out, it would be no great financial loss. One year later the breadmaker still churns like a champion. Speaking of which, it would be a good idea to ensure the machine you use has a setting that will keep the paddle constantly moving (in this case, the butter churn setting will continuously turn for 30 minutes, more than enough time for the roast). Some settings may only intermittently move the paddle, thus leaving the bean mass susceptible to local hot spots, and increase the likelihood of burning or uneven roasting.

The heat source used is an Ozito variable speed heat gun, from the local Bunnings Hardware store, again a $30.00 purchase. This also continues to work well after 12 months of roasting use. I opted for a gun with a continuous variable heat setting under the assumption that I would achieve a better level of heat control, which I do believe is the case. This particular gun has a high/low switch for the fan speed, and an adjustable heat dial at the handle end of the barrel. There are no particular heat increment scales as such (simply a continuous dial), I typically use my own arbitrary ‘hi’, ‘med’, and ‘low’ settings which have been determined along the way through experience and roast results.
A standard box fan on a chair is used to assist in keeping the heat gun cooler during the roast, as well as blowing away any excess chaff shed from the outside of the bean. Clearly this is an outdoor method of roasting, as depending on the bean, there generally is a significant amount of chaff, and the process usually gets a little smoky towards the end of the roast. When the roast is complete, the fan and chair are used to rapidly cool the beans once they are pulled from the drum (refer to The Process below).
The “scaffolding” used to hold everything in place is simply an adjustable saw horse with a clamping mechanism enabling the heat gun to be held in position above the bread-maker, and a piece of plywood spanning the support struts underneath as a platform. Both items were lying around the shed when I initially searched for a way to put everything in position, and continue to do the job perfectly. I have seen various other methods of heat gun suspension, from modified lamp arms to beaker clamps, and even custom-made benches. If you start looking around the house I’m sure you will find something to do the job. Just remember the heat gun barrel will get hot, and clamp it well as the vibration may work it loose if not secured effectively.
Roast Batches
The initial batches were 150–200 grams, over time increasing to 300–350 grams, whereas I now tend to roast in 500 gram bean batches, finding this to be more time efficient. These batches are typically roasted for around 12–15 minutes in total, with first crack occurring somewhere in the vicinity of 7:30 – 9:00 minutes after commencing. The typical yield by weight for the roasted beans is around 84–88% of the green bean weight.
After experimenting with heat and roast times, I tend to favour lighter to medium roasts, as I find the flavour profile in the cup much more enjoyable, and I am less likely to end up with a burnt flavour from an over roasted batch.
The Process
This has not changed a great deal over the past year, except for minor adjustments, and my current process looks like this:
- Set up all components as shown in image above
- Record variables (batch size and bean, temperature, humidity, date, time of day)
- Turn on both breadmaker (butter setting to maintain constant paddle movement) and heat gun (both heat and fan on high)
- Add beans after drum has heated (generally around 2 mins) and commence timer
- Monitor for colour changes through initial phases of roast (colour changes generally dictate whether I modify the heat or not), recording anything of note
- First crack occurs, usually at around the 7:30 to 9:00 minute mark
- Reduce heat setting about 1 minute and 30 seconds into first crack
- Roast pulled out generally about 4–5 minutes after first crack or approaching second crack depending on the desired roast level
- Tip beans onto a cooling tray, which is a frame of wire mesh (similar to a small window screen – not the bowl seen in the image below as I have found the mesh tray allows a faster rate of cooling) and placed underneath the fan to cool as rapidly as possible for approximately 5 minutes
- Transfer beans onto a dry tea towel and spread out for a few hours before packing in ziplock bags with one way valves for storage
- Bag and label with roast date and description before resting for 3–7 days prior to use
- Record roast data digitally in an Evernote notebook for future reference (where most of the information and the images were retrieved for this post)

A couple of things to point out in summary. As the process occurs outdoors, the ambient temperature does influence the roast rate, which is why I record this information.
The heat is reduced after the first crack once I have the beans in a good rolling crack, as occasionally there are a few pops that occur in isolation before the main crack occurs in the entire bean mass.
Make sure the beans are fully cool before bagging (see 10 above), otherwise they may “sweat” inside the bags which leads to condensation and moisture, not a great way to begin the storage process for your beans.
Finally, ensure you record data about your roasts somewhere, even if it is just a few notes about how the roast went, time to first and/or second crack, heat settings, and the basic data indicated in 2 above. Whilst you may not need to review this often, I have found it very helpful in comparing different variables to fine tune things for a better roast, or see where things may have gone wrong when things don’t turn out so well. There are many other variables that can be measured and tracked, with tools such as temperature thermocouples and USB data logging programmes for the more technically minded. I have not used these myself, however more information on these can be found on the Coffee Snobs forum link above.

So there we have it, my basic but effective home roasting set up and process. I have tried to include some information on what I was unsure of myself when starting out, however do some more reading on this yourself, and at least determine a starting point. Be prepared for a little trial and error after that. If you are in two minds about starting this for yourself, I’d recommend diving in and having go, as for a small outlay initially, you may end up with a setup that works well for a number of years, and there is nothing more satisfying (and cost-effective) than bagging up a kilo of your own freshly roasted beans.

Go on, you know you want to ….


